
IT STUDY LOG
Sprint - Terraform x AWS 본문
#학습 목표
다음의 아키텍처를 terraform을 이용해 작성

- 퍼블릭 인터넷이 아닌 웹 서버에서만 DB 인스턴스를 사용할 수 있어야 하므로 퍼블릭 서브넷과 프라이빗 서브넷을 모두 포함하여 VPC를 생성
- 퍼블릭 서브넷에서 웹 서버를 호스팅하므로 웹 서버에서 퍼블릭 인터넷에 액세스 가능
- DB 인스턴스는 프라이빗 서브넷에서 호스팅
- Amazon EC2 인스턴스는 동일한 VPC 내에서 호스팅되므로 DB 인스턴스에 연결할 수 있으나 퍼블릭 인터넷에서는 DB 인스턴스를 사용할 수 없으므로 보안이 강화됨
- 별도의 가용 영역에서 추가 퍼블릭 및 프라이빗 서브넷을 구성
- Amazon RDS DB 인스턴스용 VPC 구성
- 이러한 VPC 시나리오에 대한 웹 서버를 생성하는 방법을 보여 주는 자습서는 자습서: 웹 서버 및 Amazon RDS DB 인스턴스 생성 단원을 참조
- Amazon VPC 대한 자세한 내용은 Amazon VPC 시작 안내서 및 Amazon VPC 사용 설명서를 참조
- Amazon EC2 인스턴스와 DB 간에 네트워크 연결을 설정할 수 있음(자세한 내용은 EC2 인스턴스와의 자동 네트워크 연결 구성 섹션 참조)
#해결 과제
💡 자습서: DB 인스턴스에 사용할 Amazon VPC 생성
💡 EC2 인스턴스 생성
💡 애플리케이션 로드 밸런서 및 Auto Scaling Group 적용
# 참고 사항
- IaC 코드를 작성하려면 먼저 AWS Management Console을 이용해 먼저 최종 인프라 상태를 만들어놓고, 잘 작동하는지 확인한 다음, 이를 해당하는 리소스를 하나씩 코드로 옮기는 방법을 사용하는 방식을 사용하기
- 먼저 AWS Management Console을 통해 최종 결과물을 따라 해보고, 예상 상태가 무엇인지 먼저 파악
- 모든 리소스를 만들 때에는 반드시 이름을 붙이기
#과제 항목별 진행 상황
✏️ Terraform 구조 및 파일 구성
# version.tf : terraform 블럭
# variables.tf : 변수
# main.tf : IaC 인프라 생성 코드
# outputs.tf : RDS 생성 후 정보
# user-data.sh : EC2 생성 시 사용자 데이터
# version.tf
terraform {
cloud {
organization = "roheerumi"
workspaces {
name = "terraform-study"
}
required_providers {
aws = {
source = "hashicorp/aws"
version = "4.67.0"
}
}
}
}# variables.tf
variable "region" {
default = "ap-northeast-2"
description = "AWS region"
}
variable "server_port" {
default = 80
}# main.tf
# 1) AWS provider의 resource, 2) terraform의 aws 레지스트리 module 사용
provider "aws" {
region = var.region
}
# ... 하략 ... #
✏️ 자습서: DB 인스턴스에 사용할 Amazon VPC 생성
Step 1 : VPC 및 서브넷 생성
- 프라이빗 서브넷 2개와 퍼블릭 서브넷 2개로 총 네 개 생성
[AWS 콘솔] 콘솔에서 생성

- https://console.aws.amazon.com/vpc/에서 Amazon VPC 콘솔로 접속
- AWS Management Console의 오른쪽 상단에서 VPC를 생성할 리전을 선택
- 왼쪽 상단 모서리에서 VPC 대시보드를 선택 VPC 생성을 시작하려면 VPC 생성을 선택
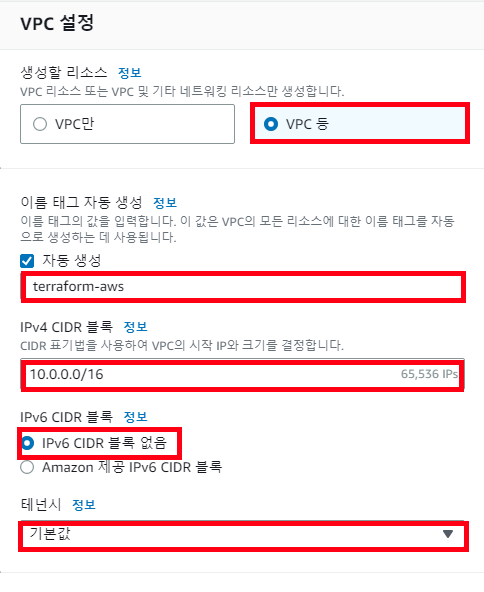
- VPC 설정의 생성할 리소스에서 VPC 등을 선택
- VPC 설정을 위해 다음 값을 설정
- 네임 태그 자동 생성 - 사용할 이름 지정
- IPv4 CIDR block: - 10.0.0.0/16
- IPv6 CIDR 블록 - No IPv6 CIDR Block(IPv6 CIDR 블록 없음)
- 테넌시 - 기본값
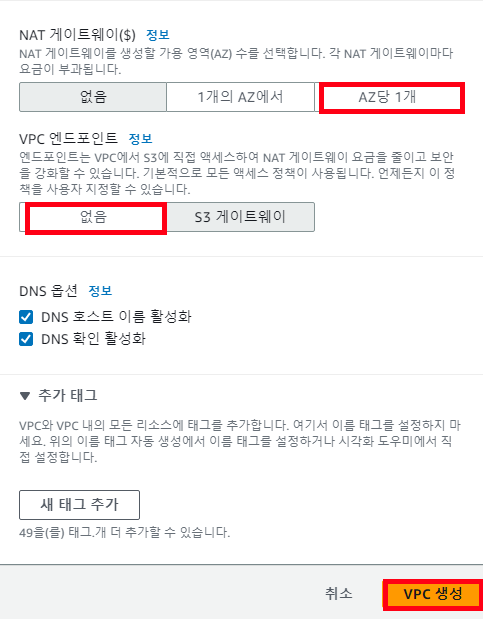
- 가용 영역(AZ)의 수 - 2
- Customize AZs(AZ 사용자 지정) - 기본값을 유지
- 퍼블릭 서브넷 수 – 2
- 프라이빗 서브넷 수 – 2
- Customize subnets CIDR blocks(서브넷 CIDR 블록 사용자 지정) - 기본값을 유지
- NAT 게이트웨이($) – 있음
- VPC 엔드포인트 – 없음
- DNS options(DNS 옵션) - 기본값을 유지
- VPC 생성을 선택
[Terraform] IaC 코드로 작성
# main.tf

###################################################################################
# 1. VPC 생성
# IPv4 CIDR block: - 10.0.0.0/16
# IPv6 CIDR 블록 - No IPv6 CIDR Block(IPv6 CIDR 블록 없음)
# 테넌시 - 기본값
# 가용 영역(AZ)의 수 - 2
# Customize AZs(AZ 사용자 지정) - 기본값을 유지
# 퍼블릭 서브넷 수 – 2
# 프라이빗 서브넷 수 – 2
# Customize subnets CIDR blocks(서브넷 CIDR 블록 사용자 지정) - 기본값 유지
# NAT 게이트웨이($) – 생성
# VPC 엔드포인트 – 없음
# DNS options(DNS 옵션) - 기본값 유지
module "terraform-aws-vps" { # 모듈 사용
  source = "terraform-aws-modules/vpc/aws"

  # 이름 및 vpc cidr 지정
  name = "terraform-aws-vps"
  cidr = "10.0.0.0/16"

  # az, 서브넷 cidr 지정
  azs             = ["ap-northeast-2a", "ap-northeast-2c"]
  private_subnets = ["10.0.1.0/24", "10.0.2.0/24"]
  public_subnets  = ["10.0.101.0/24", "10.0.102.0/24"]

  # 각 서브넷 생성 시 suffix 시정
  private_subnet_suffix  = "private"
  public_subnet_suffix =  "public"

  # igw 이름 지정
  igw_tags = {
    Name = "terraform-aws-public-igw"
  }

  # nat gateway 생성 및 설정, 이름 지정
  enable_nat_gateway = true
  one_nat_gateway_per_az = true
  nat_gateway_tags = {
    Name = "terraform-aws-public-nat"
  }
}
→ Result : terraform apply 실행 결과
(1) VPC 생성
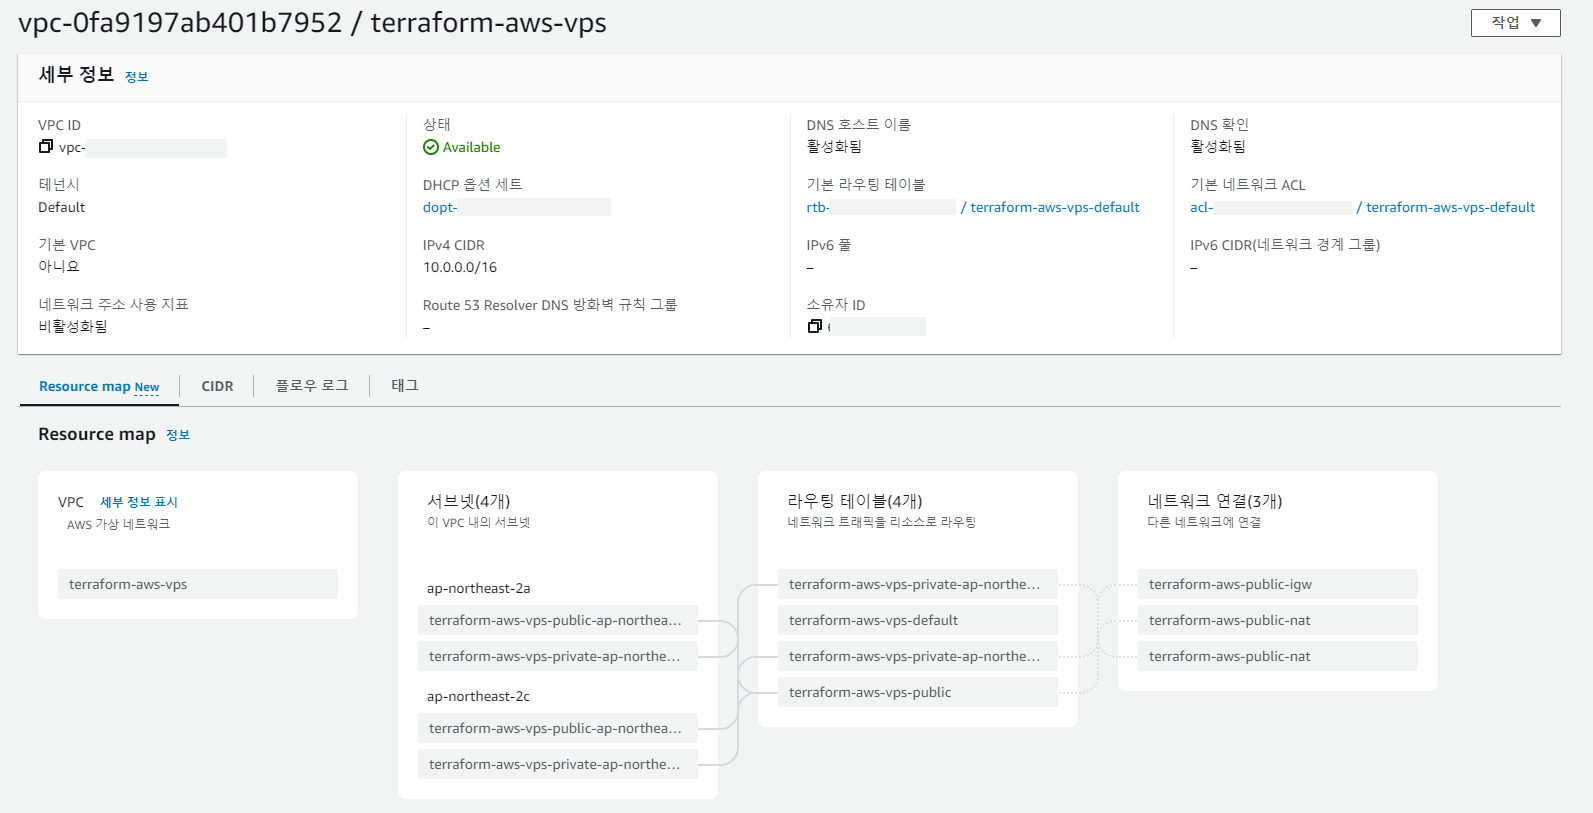
(2) 4개 서브넷 생성

(3) 라우팅 테이블 생성

(4) IGW 생성

(5) NAT Gateway 및 관련 리소스(EIP 등) 생성


Step 2 : VPC 보안 그룹 생성 : 퍼블릭 웹 서버가 사용할 VPC 보안 그룹과 프라이빗 DB 웹 서버가 사용할 VPC 보안 그룹을 만들기
[AWS 콘솔] 콘솔에서 생성
2-1. 퍼블릭 서브넷의 보안 그룹 생성
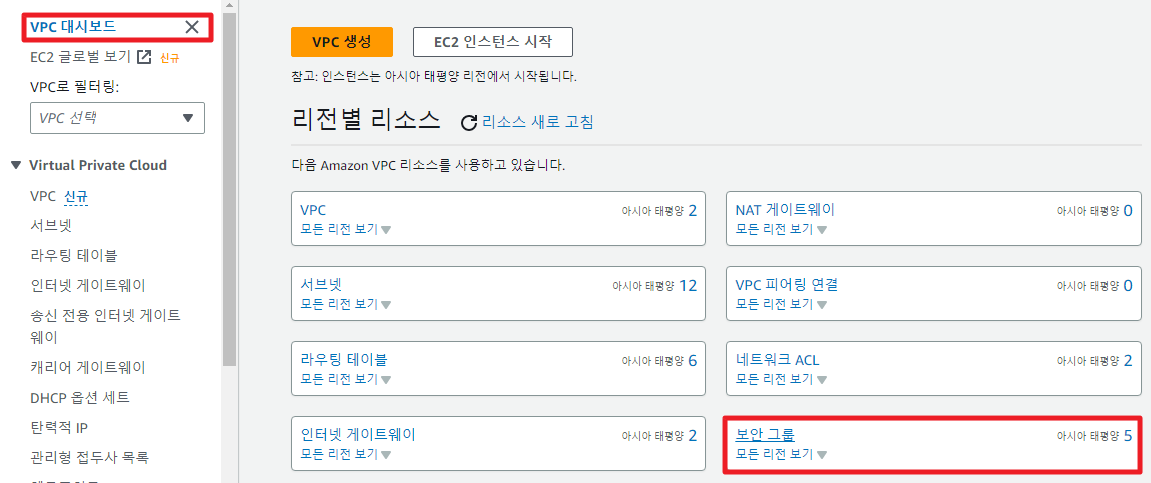
- https://console.aws.amazon.com/vpc/에서 Amazon VPC 콘솔로 접속
- VPC 대시보드, 보안 그룹, 보안 그룹 생성을 차례대로 선택
- 보안 그룹 생성 페이지에서 다음 값을 설정
- 보안 그룹 이름: terraform-aws-securitygroup
- 설명: terraform-aws Security Group
- VPC: 이전에 생성한 VPC를 선택(예: vpc-identifier(terraform-aws-vpc)).
- 인바운드 규칙을 보안 그룹에 추가
- Secure Shell(SSH)을 사용하여 VPC의 EC2 인스턴스에 연결하는 데 사용할 IP 주소를 지정
- 퍼블릭 IP 주소를 확인하려면 다른 브라우저 창 또는 탭에서 https://checkip.amazonaws.com의 서비스를 사용
- 인바운드 규칙 섹션에서 규칙 추가를 선택
- 새로운 인바운드 규칙으로 다음 값을 설정하여 SSH에서 Amazon EC2 인스턴스에 액세스하도록 허용 (Amazon EC2 인스턴스에 연결하여 웹 서버 및 다른 유틸리티를 설치 가능하며 EC2 인스턴스에 연결하여 웹 서버의 콘텐츠를 업로드 가능)
- Type: SSH
- 소스: 4-1단계에서 확인한 퍼블릭 IP 주소 또는 범위(예: 203.0.113.25/32)
- [다른 규칙 추가(Add another rule)]를 선택
- 새 인바운드 규칙에 다음 값을 설정하여 웹 서버에 대한 HTTP 액세스를 허용
- 유형: HTTP
- 소스: 0.0.0.0/0
- Secure Shell(SSH)을 사용하여 VPC의 EC2 인스턴스에 연결하는 데 사용할 IP 주소를 지정
- 모든 아웃 바운드를 허용하는 아웃바운드 규칙을 보안 그룹에 추가
- 보안 그룹을 생성하려면 보안 그룹 생성(Create security group)을 선택
2-2. 프라이빗 DB 인스턴스에 대한 VPC 보안 그룹 생성
- https://console.aws.amazon.com/vpc/에서 Amazon VPC 콘솔로 접속
- VPC 대시보드, 보안 그룹, 보안 그룹 생성을 차례대로 선택
- 보안 그룹 생성 페이지에서 다음 값을 설정
- 보안 그룹 이름: terraform-aws-db-securitygroup
- 설명: terraform-aws DB Instance Security Group
- VPC: 이전에 생성한 VPC를 선택(예: vpc-identifier(terraform-aws-vpc)).
- 인바운드 규칙을 보안 그룹에 추가
- 인바운드 규칙 섹션에서 규칙 추가를 선택
- 새로운 인바운드 규칙으로 다음 값을 설정하여 Amazon EC2 인스턴스의 포트 3306에서 MySQL 트래픽을 허용 ( 웹 서버에서 DB 인스턴스에 연결 가능하며 웹 애플리케이션의 데이터를 데이터베이스에 저장하고 검색 가능)
- 유형: MySQL/Aurora
- 소스: 이 자습서에서 이전에 생성한 terraform-aws-securitygroup 보안 그룹의 식별자(예: sg-9edd5cfb)
- 보안 그룹을 생성하려면 보안 그룹 생성을 선택
[Terraform] IaC 코드로 작성
# main.tf

###################################################################################
#1. public subnet 보안그룹 생성

resource "aws_security_group" "public-terraform-aws-security-group" {
  name        = "public-terraform-aws-security-group"
  description = "public-terraform-aws-security-group"

  # VPC: 이전에 생성한 VPC를 선택
  vpc_id      = module.terraform-aws-vps.vpc_id

# inbound 규칙에 ssh, http 허용
  ingress {
    description      = "Allow to Connect VPC EC2 instances by SSH"
    from_port        = 22
    to_port          = 22
    protocol         = "tcp"
    cidr_blocks      = ["HOST IP ADDRESS/32"]
  }

    ingress {
    description      = "Allow to Connect VPC EC2 instances by SSH"
    from_port        = 3306
    to_port          = 3306
    protocol         = "tcp"
    cidr_blocks      = ["0.0.0.0/32"]
  }

   ingress {
    description      = "Allow Public Client to Connect VPC EC2 by HTTP"
    from_port        = 80
    to_port          = 80
    protocol         = "tcp"
    cidr_blocks      = ["0.0.0.0/0"]
  }

# outbound 규칙에 전부 허용 - apt update 등을 위해
  egress {
    from_port        = 0
    to_port          = 0
    protocol         = "-1"
    cidr_blocks      = ["0.0.0.0/0"]
  }

  tags = {
    Name = "public-terraform-aws-security-group"
  }
}

###################################################################################
# 2. private subnet 보안그룹 생성
resource "aws_security_group" "private-terraform-aws-db-security-group" {
  name        = "private-terraform-aws-db-security-group"
  description = "private-terraform-aws-db-security-group"

  # VPC: 이전에 생성한 VPC를 선택
  vpc_id      = module.terraform-aws-vps.vpc_id

  # inbound 규칙에 ec2에서 3306포트에 접근 가능하도록 ec2 보안 그룹 허용
  ingress {
    description      = "Allow EC2 instances to Connect MySQL"
    from_port        = 3306
    to_port          = 3306
    protocol         = "tcp"
    security_groups  = [aws_security_group.public-terraform-aws-security-group.id]
  }

  egress {
    from_port        = 3306
    to_port          = 3306
    protocol         = "tcp"
    cidr_blocks      = ["0.0.0.0/0"]
  }

  tags = {
    Name = "private-terraform-aws-db-security-group"
  }
}
→ Result : terraform apply 실행 결과

Step 3 : DB 서브넷 그룹 생성 : RDS 인스턴스가 사용할 VPC 서브넷 그룹을 만들기
[AWS 콘솔] 콘솔에서 생성
3-1. VPC 콘솔에서 DB 서브넷 그룹 생성 시 참고할 프라이빗 서브넷 식별
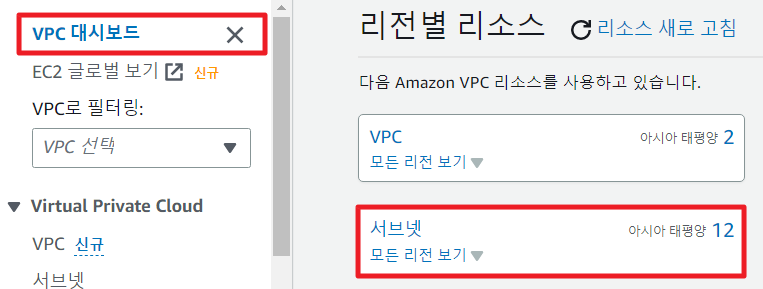
- https://console.aws.amazon.com/vpc/에서 Amazon VPC 콘솔로 접속
- VPC 대시보드를 선택한 다음 서브넷을 선택
- terraform-aws-subnet-private1-ap-northeast-2a 및 terraform-aws-subnet-private2-ap-northeast-2b라는 서브넷의 서브넷 ID를 기록
3-2. RDS 콘솔에서 DB 서브넷 그룹 생성 시 참고할 프라이빗 서브넷 식별
- https://console.aws.amazon.com/rds/에서 Amazon RDS 콘솔로 접속
- Amazon VPC 콘솔이 아닌 Amazon RDS 콘솔에 연결해야 함
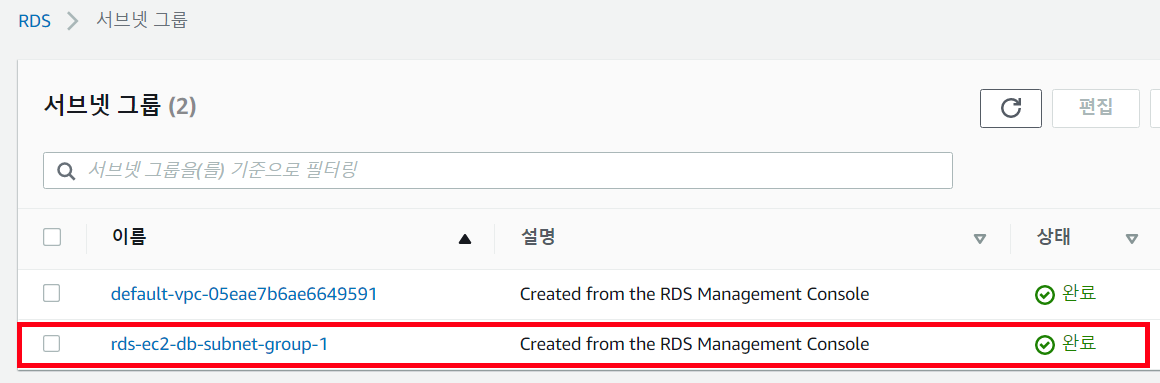
- 탐색 창에서 [Subnet groups]를 선택
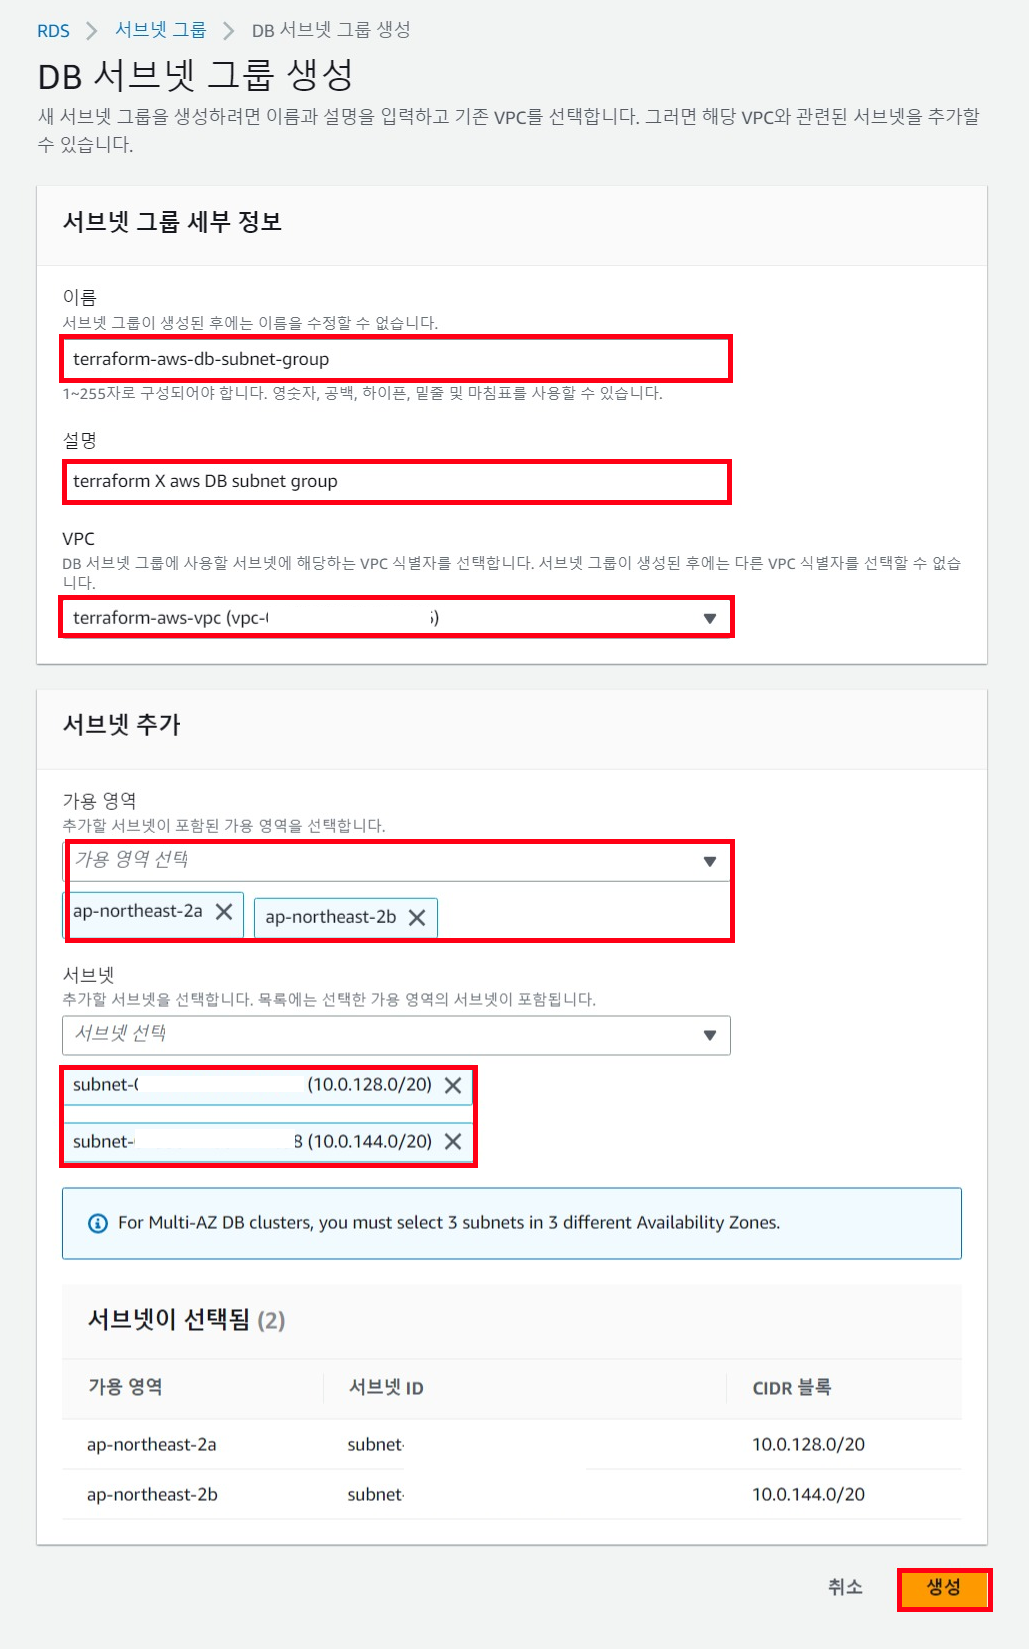
- DB 서브넷 그룹 생성을 선택
- DB 서브넷 그룹 생성 페이지에서 서브넷 그룹 세부 정보에 아래 값을설정
- 이름: terraform-aws-db-subnet-group
- 설명: terraform-aws DB Subnet Group
- VPC: terraform-aws-vpc(vpc-identifier)
- 서브넷 추가 섹션에서 가용 영역 및 서브넷을 선택
- VPC 생성 시 선택한 가용 영역으로 선택하고 서브넷에서 이전 단계에서 식별한 프라이빗 서브넷을 선택
- 생성(Create)을 선택
[Terraform] IaC 코드로 작성
# main.tf

###################################################################################
# DB 서브넷 그룹 생성
resource "aws_db_subnet_group" "terraform-aws-db-subnet-group" {
  name       = "terraform-aws-db-subnet-group"
  description = "terraform-aws-db-subnet-group"

  # private 서브넷으로 지정
  subnet_ids = module.terraform-aws-vps.private_subnets

  tags = {
    Name = "terraform-aws-db-subnet-group"
  }
}
→ Result : terraform apply 실행 결과

✏️ EC2 인스턴스 생성
- 생성할 EC2 사양
- AMI: Ubuntu Server 18
- 인스턴스 타입: t2.micro
- 사용자 데이터
- #!/bin/bash
echo "Hello, World" > index.html
nohup busybox httpd -f -p ${var.server_port} &
- #!/bin/bash
- 키 페어: 수동으로 만들고 EC2에 할당
Step 1 : EC2 생성
[AWS 콘솔] 콘솔에서 생성
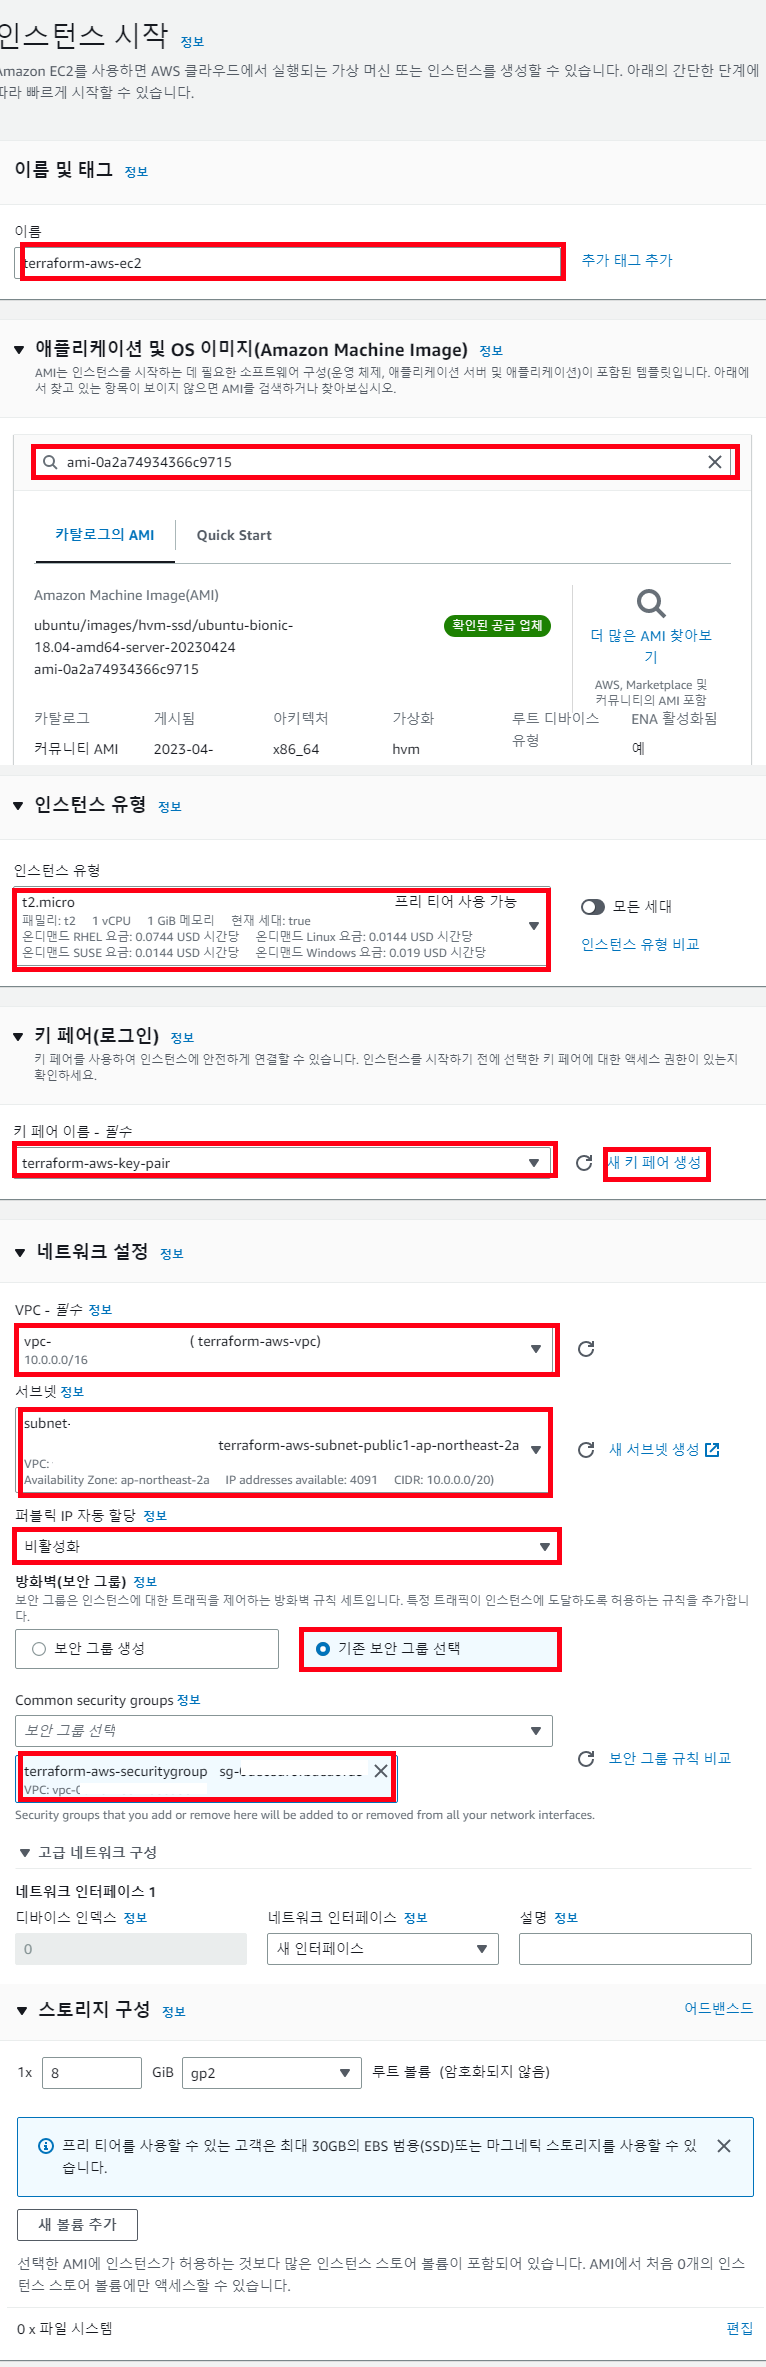
- [이름 및 태그] 섹션에서 EC2 인스턴스 이름 지정
- [애플리케이션 및 OS 이미지] 섹션에서사용할 AMI 지정
- [인스턴스 유형] 섹션에서사용할 인스턴스 유형 지정
- [키 페어(로그인)] 섹션에서 키 페어를 새로 생성하거나 사용하는 키페어로 지정
- [네트워크 설정] 섹션의 VPC에 생성한 VPC 지정
- [네트워크 설정] 섹션의 서브넷에 해당 VPC의 퍼블릭 서브넷 선택
- [네트워크 설정] 섹션의 퍼블릭 IP 자동 할당에 활성화 설정
- [네트워크 설정] 섹션의 방화벽(보안 그룹)을 기존 보안 그룹 선택 > 생성한 퍼블릭 서브넷의 보안그룹 선택
[Terraform] IaC 코드로 작성
###################################################################################
# EC2 인스턴스 생성
# 1. 각 가용영역에 EC2 인스턴스 생성을 위해 local 변수 선언
locals {
  # VPC에서 생성한 퍼블릭 서브넷 리스트
  public_subnets  = module.terraform-aws-vps.public_subnets

  public_instance_conf = [
    for index, subnet in local.public_subnets : [{
        # 각 퍼블릭 서브넷에 생성
        subnet_id              = subnet

        # 사용할 보안 그룹으로 퍼블릭 서브넷에 생성한 보안 그룹 지정
        vpc_security_group_ids = [aws_security_group.public-terraform-aws-security-group.id]

        # 인스턴스명, 사용할 ami와 instance type, 사용할 key-pair 이름 지정


        name                   = "terraform-aws-ec2-${index}"
        ami                    = "ami-0a2a74934366c9715"     # AMI: Ubuntu Server 18
        instance_type          = "t2.micro"                  # 인스턴스 타입: t2.micro
        key_name               = "terraform-aws-key-pair"    # 수동으로 만든 key pair를 EC2에 할당

        # EC2 시작시 실행할 사용자 데이터 입력
        user_data              =  <<-EOF
        #!/bin/bash
        sudo apt update
        sudo apt install -y mysql-server
        echo "Hello, World" > index.html
        nohup busybox httpd -f -p ${var.server_port} &
        EOF
      }
    ]
  ]
}

# terraform의 platten 함수를 이용해 일관된 시퀀스로 만듦
locals {
  public_instance  = flatten(local.public_instance_conf)
}

###################################################################################
# 2. local 변수를 활용해 EC2 인스턴스들 생성

resource "aws_instance" "terraform-aws-ec2" {
  for_each                    = {for key, value in local.public_instance : key => value}

  ami                         = each.value.ami
  instance_type               = each.value.instance_type

  # network
  vpc_security_group_ids      = each.value.vpc_security_group_ids
  subnet_id                   = each.value.subnet_id
  associate_public_ip_address = true

  # key-pair
  key_name                    = each.value.key_name
  user_data                   = each.value.user_data

  tags = {
    Name   = each.value.name
    Group  = "terraform-aws-ec2"
  }
}
→ Result : terraform apply 실행 결과
(1) EC2 인스턴스 생성

(2) 사용자 데이터 실행 내역
> 웹 서비스 기동

> mysql 서버 설치 후 DB 연결 되는지 확인

✏️ 자습서: DB 인스턴스 생성
Step 1 : DB 인스턴스 생성
[AWS 콘솔] 콘솔에서 생성

- AWS Management Console에 로그인한 후 https://console.aws.amazon.com/rds/에서 Amazon RDS 콘솔로 접속
- AWS Management Console의 오른쪽 상단 모서리에서 AWS 리전을 확인 EC2 인스턴스를 생성한 리전과 동일해야 함
- 탐색 창에서 데이터베이스를 선택
- 데이터베이스 생성을 선택
- 데이터베이스 생성 페이지에서 표준 생성을 선택
- 엔진 유형(Engine type)에서 MySQL을 선택
- 템플릿에서 프리 티어를 선택
- 가용성 및 내구성 섹션에서 기본값을 사용
- 설정 섹션에서 아래 값들을 설정
- DB 인스턴스 식별자 – terraform-aws-db-instance를 입력
- 마스터 사용자 이름 - admin 등 사용자명 입력
- Auto generate a password(암호 자동 생성) - 옵션 끄기
- 마스터 암호 – 암호를 입력
- 암호 확인 – 암호를 다시 입력
- [인스턴스 구성] 섹션에서 다음 값을 설정
- 버스트 가능 클래스(t 클래스 포함)
- db.t3.micro
- 스토리지 섹션에서 기본값으로 유지
- 연결 섹션에서 아래 값을 설정하고 다른 값을 기본값으로 유지
- 컴퓨팅 리소스에서 EC2 컴퓨팅 리소스에 연결을 선택
- EC2 인스턴스의 경우 terraform-aws-ec2-instance-web-server와 같이 이전에 생성한 EC2 인스턴스를 선택
- 서브넷 그룹에서 생성한 서브넷 선택
- 퍼블릭 액세스 불허
- VPC 보안 그룹에 기존 항목 선택
- [데이터베이스 인증(Database authentication)] 섹션에서 [암호 인증(Password authentication)]이 선택되어 있는지 확인
- 추가 구성 섹션을 열고 초기 데이터베이스 이름에 sample를 입력 다른 옵션은 기본 설정을 유지
- MySQL DB 인스턴스를 생성하려면 [데이터베이스 생성(Create database)]을 선택
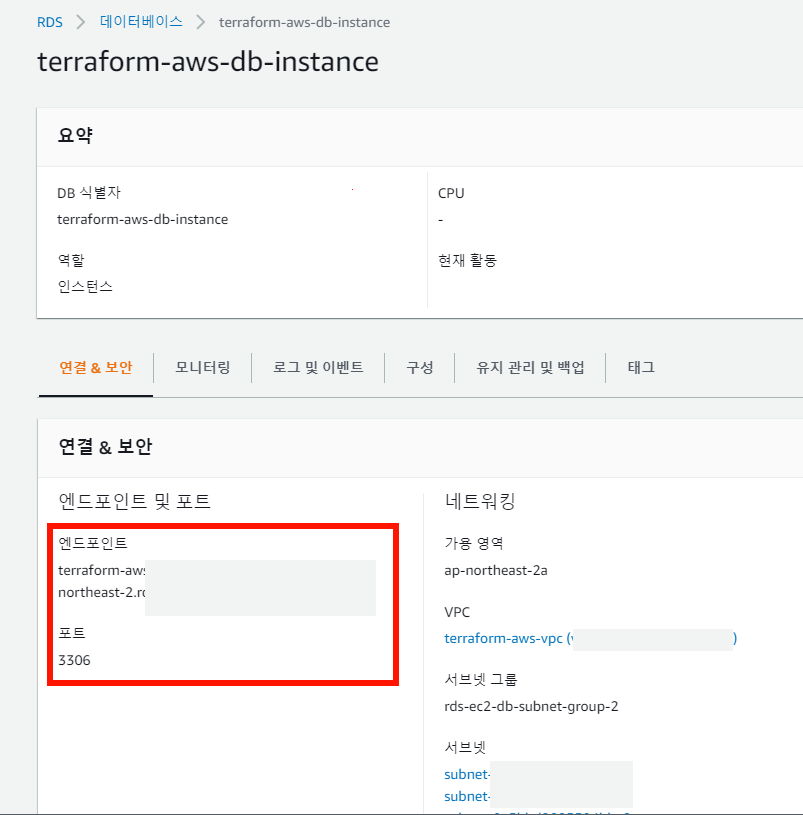
- 새 DB 인스턴스가 데이터베이스목록에 생성 중의 상태로 나타나며 새 DB 인스턴스의 상태가 사용 가능으로 나타날 때까지 기다린 후 세부 정보를 표시할 DB 인스턴스 이름을 선택
- Connectivity & security(연결 및 보안) 섹션에서 DB 인스턴스의 엔드포인트 및 포트를 확인
- DB 인스턴스의 엔드포인트와 포트를 사용하여 웹 서버를 RDS DB 인스턴스에 연결
[Terraform] IaC 코드로 작성
# variables.tf

# 변수로 사용할 패스워드 지정
 variable "MYSQL_DB_PASSWORD" {
   description = "MySQL admin user password"
   type        = string
   sensitive   = true
 }

 # 추후 콘솔에서 DB 패스워드 환경 변수 선언
 $ export TF_VAR_MYSQL_DB_PASSWORD="비밀번호"
 $ terraform init
# outputs.tf
# db 인스턴스 생성 후 참조할 output
output "rds_hostname" {
description = "RDS instance hostname"
value = aws_db_instance.terraform-aws-db.address
sensitive = true
}
output "rds_port" {
description = "RDS instance port"
value = aws_db_instance.terraform-aws-db.port
sensitive = true
}
output "rds_username" {
description = "RDS instance admin username"
value = aws_db_instance.terraform-aws-db.username
sensitive = true
}# main.tf
###################################################################################
# DB 인스턴스 생성
# 1. DB 파라메터 그룹 생성
resource "aws_db_parameter_group" "terraform-aws-db-parameter-group" {
name = "terraform-aws-db"
# 생성할 db 엔진 버전과 동일해야 함
family = "mysql8.0"
}
# 2. RDS 인스턴스 생성
resource "aws_db_instance" "terraform-aws-db" {
# db instance name
identifier = "terraform-aws-db"
# db spec
instance_class = "db.t3.micro"
allocated_storage = 20
engine = "mysql"
engine_version = "8.0.32"
# db network setting
db_subnet_group_name = aws_db_subnet_group.terraform-aws-db-subnet-group.name
vpc_security_group_ids = [aws_security_group.private-terraform-aws-db-security-group.id]
# db default setting
username = "admin"
password = var.MYSQL_DB_PASSWORD # terraform cloud setup
db_name = "terraformAwsDb"
parameter_group_name = aws_db_parameter_group.terraform-aws-db-parameter-group.name
skip_final_snapshot = true
}→ Result : terraform apply 실행 결과


✏️ 애플리케이션 로드 밸런서 및 Auto Scaling Group 적용
Step 1 : Target Group 생성
[AWS 콘솔] 콘솔에서 생성
대상 그룹 생성 - Elastic Load Balancing
대상 그룹 생성 대상 그룹에 대상을 등록합니다. 기본적으로 로드 밸런서는 대상 그룹에 대해 지정한 프로토콜과 포트 번호를 사용하여 등록된 대상으로 요청을 전송합니다. 또는 대상 그룹에
docs.aws.amazon.com
[Terraform] IaC 코드로 작성
# main.tf

###################################################################################
# 타겟 그룹 생성
resource "aws_lb_target_group" "terraform-aws-tg" {
  name        = "terraform-aws-tg"
  target_type = "instance"
  port        = 80
  protocol    = "HTTP"
  vpc_id      = module.terraform-aws-vps.vpc_id
  health_check {
    matcher = "200-299"
  }
}
→ Result : terraform apply 실행 결과

Step 2 : ALB 생성
[AWS 콘솔] 콘솔에서 생성
Application Load Balancer 생성 - Elastic Load Balancing
이 페이지에 작업이 필요하다는 점을 알려 주셔서 감사합니다. 실망시켜 드려 죄송합니다. 잠깐 시간을 내어 설명서를 향상시킬 수 있는 방법에 대해 말씀해 주십시오.
docs.aws.amazon.com
[Terraform] IaC 코드로 작성
# main.tf

###################################################################################
# 1. ALB 생성
resource "aws_lb" "terraform-aws-alb" {
  name               = "terraform-aws-alb"
  internal           = false
  load_balancer_type = "application"
  security_groups    = [aws_security_group.public-terraform-aws-security-group.id]
  subnets            = [for subnet in module.terraform-aws-vps.public_subnets : subnet]
  tags = {
    Name = "terraform-aws-alb"
  }
}

#2. 로드밸런서에 리스너 생성
resource "aws_lb_listener" "terraform-aws-alb-listener" {
  load_balancer_arn = aws_lb.terraform-aws-alb.arn
  port              = "80"
  protocol          = "HTTP"

  default_action {
    type             = "forward"
    target_group_arn = aws_lb_target_group.terraform-aws-tg.arn
  }
}
→ Result : terraform apply 실행 결과

Step 3 : Auto Scaling Group을 위한 EC2 시작 템플릿 생성
[AWS 콘솔] 콘솔에서 생성
Auto Scaling 그룹에 대한 시작 템플릿 생성 - Amazon EC2 Auto Scaling
시작 템플릿을 생성할 때 시작 템플릿 파라미터가 완전히 확인되지 않습니다. 파라미터에 잘못된 값을 지정하거나 지원되는 파라미터 조합을 사용하지 않으면 이 시작 템플릿을 사용하여 인스
docs.aws.amazon.com
[Terraform] IaC 코드로 작성
# main.tf

###################################################################################
#1. EC2 시작 템플릿 생성
resource "aws_launch_template" "terraform-aws-launch-template" {
  name                         = "terraform-aws-launch-template"
  image_id                     = "ami-0a2a74934366c9715"
  instance_type                = "t2.micro"

  #vpc_security_group_ids       = [aws_security_group.public-terraform-aws-security-group.id]
  key_name                     = "terraform-aws-key-pair"
  user_data                    =  filebase64("${path.module}/user-data.sh")

  network_interfaces {
    security_groups = [aws_security_group.public-terraform-aws-security-group.id]
    associate_public_ip_address = true
  }

  monitoring {
    enabled = true
  }

  tag_specifications {
    resource_type = "instance"

    tags = {
      Name   = "terraform-aws-ec2-autoscaled"
      Group  = "terraform-aws-ec2"
    }
  }
}
# user-data.sh
# EC2 인스턴스 시작시마다 스크립트가 기동하도록 설정
Content-Type: multipart/mixed; boundary="//"
MIME-Version: 1.0
--//
Content-Type: text/cloud-config; charset="us-ascii"
MIME-Version: 1.0
Content-Transfer-Encoding: 7bit
Content-Disposition: attachment; filename="cloud-config.txt"
#cloud-config
cloud_final_modules:
- [scripts-user, always]
--//
Content-Type: text/x-shellscript; charset="us-ascii"
MIME-Version: 1.0
Content-Transfer-Encoding: 7bit
Content-Disposition: attachment; filename="userdata.txt"
# 실제 실행하는 스크립트 내용
#!/bin/bash
sudo apt update -y
sudo apt install -y mysql-server
echo "Hello, World" > index.html
sudo nohup busybox httpd -f -p 80 &
--//--→ Result : terraform apply 실행 결과


Step 4 : Auto Scaling Group 생성
- Auto Scaling Group은 최소 2개, 최대 10개로 설정
[AWS 콘솔] 콘솔에서 생성
시작 템플릿을 사용하여 오토 스케일링 생성 - Amazon EC2 Auto Scaling
이 페이지에 작업이 필요하다는 점을 알려 주셔서 감사합니다. 실망시켜 드려 죄송합니다. 잠깐 시간을 내어 설명서를 향상시킬 수 있는 방법에 대해 말씀해 주십시오.
docs.aws.amazon.com
[Terraform] IaC 코드로 작성
# main.tf

###################################################################################
# 시작 템플릿을 바탕으로 auto scaling group 생성
resource "aws_autoscaling_group" "terraform-aws-auto-scaling-group" {
  name                      = "terraform-aws-auto-scaling-group"
  max_size                  = 10
  min_size                  = 2
  health_check_grace_period = 300
  desired_capacity          = 2
  vpc_zone_identifier       = [for subnet in module.terraform-aws-vps.public_subnets : subnet]
  launch_template {
    id = aws_launch_template.terraform-aws-launch-template.id
    version = "$Latest"
  }
  target_group_arns = [aws_lb_target_group.terraform-aws-tg.arn]
}
→ Result : terraform apply 실행 결과


#TROUBLE SHOOTING & STUDY LOG
📝 EC2 시작 시 user-data.sh 파일이 실행되지 않는 문제
현상
__init__.py[WARNING]: Unhandled non-multipart (text/x-not-multipart) userdata: 'b'\\ufeff#!/bin/bash'...'원인
- terraform은 us-ascii 인코딩을 사용하는데 vscode에서 sh파일 생성 시 utf-8로 인코딩되기 때문에 발생하는 문제
- cloud-init.log 확인 시 python에서 인코딩 시 \\ufeff 문자가 디코딩된 로그 확인 가능
해결 방안
- user-data.sh 파일을 us-ascii 인코딩해서 전달
- ec2 인스턴스에 ssh 접속 시 /var/log/cloud-init.log에서 오류 확인이 가능하고, /var/lib/cloud/<instances명>에 실행된 사용자 데이터 확인 가능
2023-05-16 10:22:38,126 - handlers.py[DEBUG]: finish: init-network/consume-user-data: SUCCESS: reading and applying user-data
📝 terraform destroy 시 network Interface가 삭제되지 않는 현상
원인
- terraform 파일 작성 시 load balancer 리소스 블럭에 enable_deletion_protection = true 설정을 하면 삭제 방지가 되어 삭제되지 않는 현상
해결 방안
- 해당 설정을 해제
📝 terraform block 중 resource와 module 차이
resource
- 리소스는 aws_vpc, aws_db_instance등
- 리소스는 공급자에 속하고, 인수를 받아들이고, 속성을 출력하고, 수명 주기를 가짐
- 리소스를 생성, 검색, 업데이트 및 삭제 가능
module
- 리소스 모듈은 공통 작업을 함께 수행하는 연결된 리소스 모음 (ex. VPC, 서브넷, NAT 게이트웨이 등 생성)
- 공급자 구성에 따라 달라지며, 공급자 구성 또는 상위 수준 구조(예: 인프라 모듈)에서 정의 가능
#References
DB 인스턴스 생성 - Amazon Relational Database Service
이 페이지에 작업이 필요하다는 점을 알려 주셔서 감사 실망시켜 드려 죄송 잠깐 시간을 내어 설명서를 향상시킬 수 있는 방법에 대해 말씀해 주십시오.
docs.aws.amazon.com
https://docs.aws.amazon.com/ko_kr/AWSEC2/latest/UserGuide/AccessingInstancesLinux.html
SSH를 사용하여 Linux 인스턴스에 연결 - Amazon Elastic Compute Cloud
이 페이지에 작업이 필요하다는 점을 알려 주셔서 감사 실망시켜 드려 죄송 잠깐 시간을 내어 설명서를 향상시킬 수 있는 방법에 대해 말씀해 주십시오.
docs.aws.amazon.com
https://cloud-images.ubuntu.com/locator/ec2/
Ubuntu Amazon EC2 AMI Finder
Amazon EC2 AMI Locator As Ubuntu cloud images are uploaded and registered on the Amazon EC2 cloud, they are referred to as AMI (Amazon Machine Images). Each AMI is a machine template from which you can instantiate new servers. Each AMI has its own unique I
cloud-images.ubuntu.com
EC2 인스턴스에 웹 서버 설치 - Amazon Relational Database Service
Apache 테스트 페이지는 문서의 루트 디렉터리 /var/www/html에 콘텐츠가 없는 경우에만 표시됩니다. 문서의 루트 디렉터리에 콘텐츠를 추가한 후에는 콘텐츠가 EC2 인스턴스의 퍼블릭 DNS 주소에 나타
docs.aws.amazon.com
https://ubuntu.com/server/docs/databases-mysql
Install and configure a MySQL server | Ubuntu
Ubuntu is an open source software operating system that runs from the desktop, to the cloud, to all your internet connected things.
ubuntu.com
https://developer-ping9.tistory.com/402
[AWS] Could not connect to eu-west-1.ec2.archive.ubuntu.com:80 (54.229.116.227), connection timed out 해결법
Failed to fetch http://eu-west-1.ec2.archive.ubuntu.com/ubuntu/pool/universe/a/autogen/libopts25_5.18.12-4_amd64.deb Could not connect to eu-west-1.ec2.archive.ubuntu.com:80 (54.229.116.227), connection timed out Could not connect to eu-west-1.ec2.archive.
developer-ping9.tistory.com
https://yunamom.tistory.com/295
[EC2] 101: network is unreachable - apt update 에러 해결
AWS EC2 우분투 서버에러 101: 네트워크가 접근 불가능 / 101: network is unreachable ubuntu@green:~$ sudo apt update 오류:1 http://security.ubuntu.com/ubuntu focal-security InRelease security.ubuntu.com:80에 연결을 초기화할
yunamom.tistory.com
https://developer-ping9.tistory.com/402
[AWS] Could not connect to eu-west-1.ec2.archive.ubuntu.com:80 (54.229.116.227), connection timed out 해결법
Failed to fetch http://eu-west-1.ec2.archive.ubuntu.com/ubuntu/pool/universe/a/autogen/libopts25_5.18.12-4_amd64.deb Could not connect to eu-west-1.ec2.archive.ubuntu.com:80 (54.229.116.227), connection timed out Could not connect to eu-west-1.ec2.archive.
developer-ping9.tistory.com
https://registry.terraform.io/providers/hashicorp/aws/latest/docs
Terraform Registry
registry.terraform.io
https://registry.terraform.io/modules/terraform-aws-modules/vpc/aws/latest
Terraform Registry
registry.terraform.io
https://registry.terraform.io/providers/hashicorp/aws/latest
Terraform Registry
registry.terraform.io
https://registry.terraform.io/modules/terraform-aws-modules/security-group/aws/latest/submodules/web
Terraform Registry
registry.terraform.io
https://github.com/terraform-aws-modules/terraform-aws-security-group/blob/master/
https://registry.terraform.io/modules/terraform-aws-modules/vpc/aws/latestrules.tf
Terraform Registry
registry.terraform.io
https://github.com/hashicorp/learn-terraform-rds
GitHub - hashicorp/learn-terraform-rds
Contribute to hashicorp/learn-terraform-rds development by creating an account on GitHub.
github.com
https://registry.terraform.io/providers/hashicorp/aws/latest/docs/resources/instance
Terraform Registry
registry.terraform.io
https://www.middlewareinventory.com/blog/terraform-aws-ec2-user_data-example/
Terraform AWS EC2 user_data example - aws_instance| Devops Junction
Terraform EC2 user_data example. How to run custom shell scripts and commands during the launch of EC2 instance with Terraform user data example.
www.middlewareinventory.com
Provision Multiple EC2 Instances on Multiple Subnets using Terraform
Terraform Create Multiple EC2 with different Configuration
levelup.gitconnected.com
Terraform: How can I reference Terraform cloud environmental variables?
I'm using Terraform cloud. I would like to take advantage of using AWS Tags with my resources. I want to tag each resource defined in Terraform with the current GIT Branch Name. That way I can sepa...
stackoverflow.com
https://developer.hashicorp.com/terraform/language/values/variables#environment-variables
Input Variables - Configuration Language | Terraform | HashiCorp Developer
Input variables allow you to customize modules without altering their source code. Learn how to declare, define, and reference variables in configurations.
developer.hashicorp.com
https://discuss.hashicorp.com/t/passing-user-data-to-ec2-instance/12251
Passing User_data to EC2 Instance
Hey, Below is the sample code I got and trying to pass user_data to the EC2 instance, but facing issues. Is there anyway to get help on this? resource "aws_instance" "ec2" { ami = "${var.instance_ami}" instance_type = "${var.instance_type}" key_name = "${v
discuss.hashicorp.com
https://developer.hashicorp.com/terraform/language/expressions/for
For Expressions - Configuration Language | Terraform | HashiCorp Developer
For expressions transform complex input values into complex output values. Learn how to filter inputs and how to group results.
developer.hashicorp.com
NAT Gateway 사용 사례 - Amazon Virtual Private Cloud
이 페이지에 작업이 필요하다는 점을 알려 주셔서 감사 실망시켜 드려 죄송 잠깐 시간을 내어 설명서를 향상시킬 수 있는 방법에 대해 말씀해 주십시오.
docs.aws.amazon.com
https://docs.aws.amazon.com/ko_kr/vpc/latest/userguide/vpc-nat-gateway.html#nat-gateway-creating
NAT 게이트웨이 - Amazon Virtual Private Cloud
보조 IPv4 주소는 선택 사항이며 NAT 게이트웨이를 사용하는 워크로드가 단일 대상(동일한 대상 IP, 대상 포트 및 프로토콜)에 대한 동시 연결 55,000개를 초과하는 경우 지정하거나 할당해야
docs.aws.amazon.com
https://docs.aws.amazon.com/ko_kr/vpc/latest/userguide/amazon-vpc-limits.html#vpc-limits-eips
Amazon VPC 할당량 - Amazon Virtual Private Cloud
이 페이지에 작업이 필요하다는 점을 알려 주셔서 감사 실망시켜 드려 죄송 잠깐 시간을 내어 설명서를 향상시킬 수 있는 방법에 대해 말씀해 주십시오.
docs.aws.amazon.com
https://terraform101.inflearn.devopsart.dev/cont/vpc-practice/vpc-practice-with-nat/
Private Subnet 및 NAT 구성 :: Terraform & AWS 101
Private Subnet 및 NAT 구성 본 페이지에서 생성하는 리소스 중 Nat Gateway는 비용이 많이 발생하는 서비스 잠깐 생성하고 지우면 문제되지 않지만, 시간단위로 과금되기 때문에 실습이 끝나시
terraform101.inflearn.devopsart.dev
https://github.com/terraform-aws-modules/terraform-aws-vpc/pull/816
feat: Add custom subnet names by andrewtcymmer · Pull Request #816 · terraform-aws-modules/terraform-aws-vpc
Description This PR adds the option to override the values used in resource tags with key "Name" (Name tags) with a list of strings, on public and private subnets. By default (if the optional varia...
github.com
https://developer.hashicorp.com/terraform/language/expressions/references
References to Values - Configuration Language | Terraform | HashiCorp Developer
Reference values in configurations, including resources, input variables, local and block-local values, module outputs, data sources, and workspace data.
developer.hashicorp.com
https://tf-eks-workshop.workshop.aws/600_extra_content/610-second-node-group/tf-files.html
Terraform EKS Workshop
Terraform files explanation Terraform files and explanation The first five files have been pre-created from the gen-backend.sh script in the tf-setup stage, The S3 bucket and DynamoDB tables were also pre-created in the tf-setup stage. backend-cluster.tf,
tf-eks-workshop.workshop.aws
GitHub - hashicorp/terraform-provider-aws: Terraform AWS provider
Terraform AWS provider. Contribute to hashicorp/terraform-provider-aws development by creating an account on GitHub.
github.com
https://docs.aws.amazon.com/ko_kr/AWSEC2/latest/UserGuide/user-data.html
시작 시 Linux 인스턴스에서 명령 실행 - Amazon Elastic Compute Cloud
시작 시 Linux 인스턴스에서 명령 실행 Amazon EC2에서 인스턴스를 시작할 때 사용자 데이터를 인스턴스에 전달하여 일반적인 구성 작업을 자동으로 수행하는 데 사용하도록 할 수 있고, 인스턴스가
docs.aws.amazon.com
https://developer.hashicorp.com/terraform/language/functions/filebase64
filebase64 - Functions - Configuration Language | Terraform | HashiCorp Developer
The filebase64 function reads the contents of the file at the given path and returns them as a base64-encoded string.
developer.hashicorp.com
https://repost.aws/ko/knowledge-center/execute-user-data-ec2
EC2 인스턴스를 처음 시작한 후 사용자 데이터 실행
Amazon Elastic Compute Cloud(Amazon EC2) 인스턴스를 다시 시작할 때마다 사용자 데이터를 사용하여 스크립트를 실행하려고 어떻게 해야 하나요?
repost.aws
https://developer.hashicorp.com/terraform/language/functions/flatten
flatten - Functions - Configuration Language | Terraform | HashiCorp Developer
The flatten function eliminates nested lists from a list.
developer.hashicorp.com
https://medium.com/@mitesh_shamra/module-in-terraform-920257136228
Module in Terraform
Till now we went through the basics of terraform and how we can use it for provisioning our infrastructure. What are states in terraform…
medium.com
https://www.terraform-best-practices.com/key-concepts
Key concepts - Terraform Best Practices
Resource is aws_vpc, aws_db_instance, etc. A resource belongs to a provider, accepts arguments, outputs attributes, and has a lifecycle. A resource can be created, retrieved, updated, and deleted.
www.terraform-best-practices.com
'devops bootcamp 4 > pair/team log' 카테고리의 다른 글
| Sprint - Auto Scaling + CloudWatch를 이용한 알림 (0) | 2023.06.02 |
|---|---|
| Sprint - 새 버전이 망가졌어요 (0) | 2023.05.19 |
| Sprint - 서버리스 애플리케이션 (0) | 2023.05.11 |
| Sprint - API Gateway와 서버리스 애플리케이션 (1) | 2023.05.11 |
| Sprint - 도메인 주도 설계 실습 (0) | 2023.05.04 |


